j0chn

This is my blog about everything which comes into my mind, what I find noteworthy.

The problem

After a while I had problems connecting my devices to my local network via IPv4. I had some connections form devices which supported IPv6 but there I was not able to reach all internet services. I restarted the router and everything worked like a charm, but only for the rest of the day. The next day, I got the same problem again.

The cause

I run Proxmox and everything worked fine at the beginning but after I got previously mentioned problems I chcked the containers and in the network tab of my PiHole, I saw that it snatched all remaining IPv4 Adresses, causing the trouble. After some investigation I found out that my router was not able to assign the static IP to PiHole and gave out all remaining ones. The static assignment happens with help of the MAC Address and hands out the defined IP address (see the WIKI Article about ARP), so I had to find out what happened.

The solution

There are two tools which helped finding the problem. The first is ARP the second is ip neighbour. Both got commands / options to display IP assignments: – apr -a – ip neigh with help of grep you can reduce the list to the static IP which should be assigned to PiHole. In my case it looks like this:

arp -a | grep 192.168.1.24
192.168.1.24     0x1         0x2         00:00:00:00:00:00     *        br-lan
ip neigh | grep 192.168.1.24
192.168.1.24 dev br-lan lladdr 00:00:00:00:00:00 REACHABLE 

Here you can see that the IP is assigned to the Mac Address 00:00:00:00:00:00 but of course the PiHole container does have a Mac Address which is not zero. To resolve this, you need to delete the cached assignment.
Therefore you have two options: – delete the whole cache – delete only that single entry
Whole cache deletion: – ip -s -s neigh flush all (the s options are for verbose output and can be removed) – for e in $(arp -a | sed -n 's/.(([^()])).*/\1/p'); do arp -d $e; done ( found here )
Single entry deletion: – ip neigh del 192.168.1.24 lladdr 00:00:00:00:00:00 dev br-lan – arp -d 192.168.1.24
With this commands the arp cached is free again and the router can newly assign the IP to the mapped Mac Adress and my PiHile server won't snatch all remaining IP addresses anymore.

How I noticed

Because of my pihole snatching all remaining ipv4 addresses from my DHCP Server (main router with openWRT), I thought of checking the log would be a good Idea. In logs I did not only find the entries regarding DHCP but also a lot entries like this:

[Aug 16, 2026, 20:02:30 GMT+2] authpriv.info: dropbear[31812]: Child connection from 91.92.40.43:11952
[Aug 16, 2026, 20:02:30 GMT+2] authpriv.info: dropbear[31812]: Exit before auth from <91.92.40.43:11952>: Exited normally

And I thought, that this can't be good. An external IP address not being mine trying to authenticate via dropbear (SSH server). So I duckduckgoed, asked in my signal groups and asked AI, but I did not really get an answer why this is, “just” some hints how to test if SSH is opened for the whole world.

How I found the reason

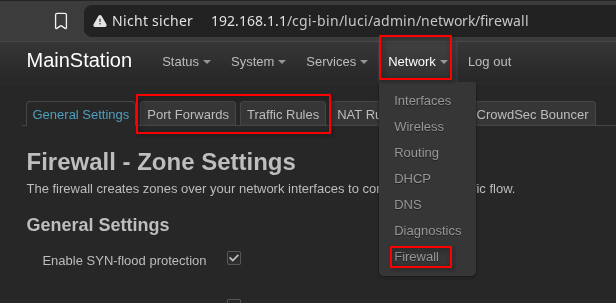
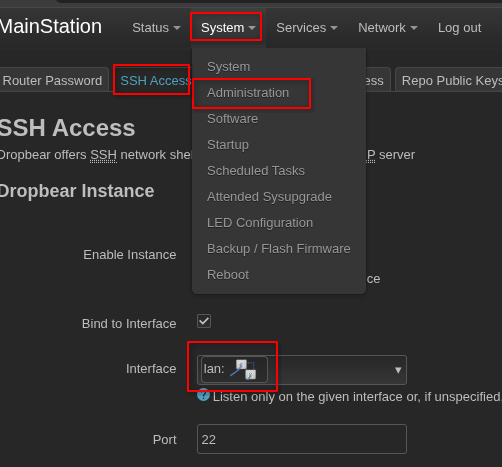
As I did not get any meaningful help, I checked the port forwards and traffic rules in openWRT (Network –> Firewall –> Port Forwards / Traffic Rules)path to firewall,but did not find anything related to SSH / Port 22 also. This was a bit frustrating and I check the firewall overview. And again nothing. But I guess I was just blind, because here should be listed everything related to traffic ;). So I simply clicked through all the menu items, tabs and so on, until I found one thing called “SSH Access” within Admin menu.
The Problem

It is no real problem but a configuration, I guess I messed up at initial installation. You can enable SSH access to the router and tell it on which interface it should listen. If you do not select any interface, it listens to every interface. So the interface to the outside world is included. SSH Access

The Solution

In my case I only need access from within my local network. So I could simply change the interface to my local one. And that's it :D

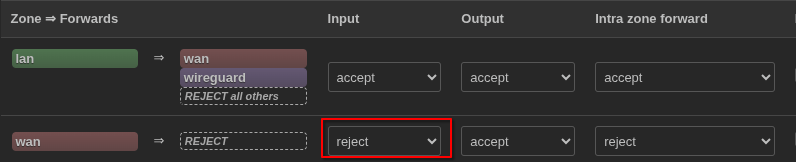
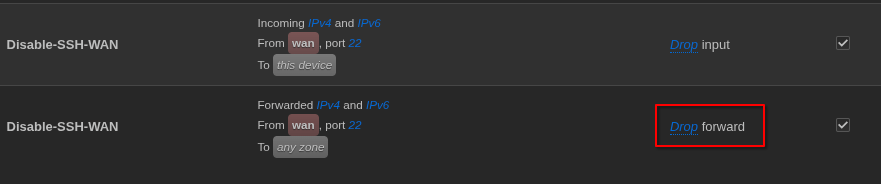
#Edit I got a hint, that I can let the SSH Access set to all interfaces and in the firewall zone for WAN I should drop or reject input traffic. I also got a traffic rule to drop SSH requests. But this was set to forward and not for input. I changed this to following setup: wan zone drop traffic rule drop


Why?

If you are developing a SAP RAP app and need some individual coding, you are within the context of the app. In terms of authorizations this basically means that you have access to the current entity without the need of authority checks and just need authority checks (privileged access) if you are selecting, writing data or do other stuff outside the entity. So if you want to do some SAP standard stuff, you will not be able to do so, unless you leave the context.

How?

Background Processing Framework

The tool helping us doing so is the Background Processing Framework (bgPF). I won't explain it in detail, because SAP does it here already ;). Of course I will tell you here, what you need to do, to break the boundaries. The bgPF contains of two interfaces and two major methods. The first ones are the one, you can ignore, because they will stay in context and only let you process the stuff in background (obviously). Those are the interface if_bgmc_op_single and the method set_operation. So take care to use the ones we need: if_bgmc_op_single_tx_uncontr and set_operation_tx_uncontrolled.

Example

Lets say you want to create transport requests and allow your users to do it on their own without needing authorization of a developer. Than you can create a simple app containing a field for the description and call the logic in an uncontrolled transaction.

First you need the class implementing the interface for the bgPF and implement the execute method containing the logic to create the transport request (or whatever you need to do):

CLASS zcl_bgpf_impl Definition.
   PUBLIC Section.
      INTERFACES:
        if_bgmc_op_single_tx_uncontr.

      METHODS:
        constructor
          IMPORTING
            iv_description TYPE c LENGTH 50. (will adjust the type, I do not have it in mind right now).

  PRIVATE Section.
    DATA:
      mv_description TYPE c LENGHT 50.

ENDCLASS.

CLASS zcl_bgpf_impl Implementation.

   METHOD constructor.
     mv_description = iv_description.
   ENDMETHOD.

   METHOD if_bgmc_op_single_tx_uncontr~execute.
     DATA(lo_workbench_request) = xco_cp_cts=>transports->workbench( '<yoursystemid>' )->create_request( mv_description ).
     DATA(lo_task) = lo_workbench_request->create_task( ).
   ENDMETHOD.

ENDCLASS.

This is already the implementation part. Of course you need to call the bgPF method properly. This can be done as followed (only the necessary part is shown). The description of course needs to be properly determined by the RAP app and passed to the constructor.

"Create instance of the class to process
DATA(lo_operation) = NEW zcl_bgpf_impl(
  iv_description = lv_description
).

"Create bgPF classes
DATA(lo_process_factory) = cl_bgmc_process_factory=>get_default( ).
DATA(lo_process) = lo_process_factory->create( ).
"Pass instance to bgPF
lo_process->set_name( 'handle user role' )->set_operation_tx_uncontrolled( lo_operation ).
"Execute class
lo_process->save_for_execution( ).

And that's it already. Just a few rows of code and you are able to do whatever you want ignoring your apps' context :D

Every programming language I know has an easy defaulting / initializing without or with extreme little boiler code, except Rust, until now.


“Normal” programming languages

In a lot of programming languages you can set a default or initializing value to a variable at the time of declaration, like this in ABAP: DATA: lv_int TYPE i VALUE 1. Or like in dart: int lv_int = 1; This is a convenient way of setting the first value to variable. One line with little boiler code (ABAP) or even none (dart). This is the way I want to declare variables.

The Rust way

This is a short description of how initialization in Rust works. The documentation is the best place to read about it in detail. In Rust you can't use such a short syntax to default or initialize variables. Here you have to pass the default values during instantiation which may lead to a lot of functions, because you have to pass the values to each property in the signature or use a whole function to default your values (example from rustfaq):

use std::default::Default;

struct User {
    username: String,
    active: bool,
    role: String,
}

impl Default for User {
    fn default() -> Self {
        User {
            // "guest" is a safe placeholder that won't break auth checks.
            username: String::from("guest"),
            // New users start active by policy.
            active: true,
            // Default role is restricted.
            role: String::from("viewer"),
        }
    }
}

This is a lot of unnecessary coding if you just want to default the values and have a structure with lot of properties. But this is the way, how rust works, until now

The dark Rust

In the nightly toolchain Rust added a new way of initializing structures: “The normal way”. In the current nightly, you are able to have the possibility to default your structures values like in other languages, by setting the value at declaration time. The features is called default _field_values and works like this: Add this feature to your Rust file: #![feature(default_field_values)] And let your struct derive the default: #[derive(Default)] And default your properties:

struct User {
    username: String::from("guest");
    active: bool = true,
    role: String::from("viewer"),
}

And that's it. It is as easy as in other languages and you keep your code cleaner as you do not need any boiler code anymore.

But wait

If you want to use this convenient feature, you have to keep in mind, that this is the nightly toolchain. Any new feature in the nightly can be removed again. So if you plan to use this, be prepared to change it back to the old way again. I don't think, that it is likely to be removed, as this is a cool quality of life feature which raises declaration to the standard level of programming languages. But I am not part of the Rust developers and can't tell whether this will become stable or not. So be warned to use this


Preface

I wanted to have a more professional passwordmanager, so me and my family can have our own passwords and shared ones. So I decided to install a vaultwarden instance to my proxmox server. Thanks to proxmox ve helper scripts it was the easiest thing to do so and instantly usable. The problem: only from browser because it did not have a proper certificate for the android app

Requirement

I wanted to use the android app because we do most stuff with our mobile phone. But the app did not accept the certificate and as vaultwarden needs to have a secured connection, I was not able to simply use http. As we have a wireguard VPN to our homenetwork and I do not want to expose my vaultwarden to the internet, I had to find a solution in which I can get both: the trusted certificate and the local network only mode.

The solution

With help of some guys of a signal group, I got the solution, how to achieve this. 1. I need to use my already installed pihole to resolve the domain locally to my also already installed caddy server 2. I had to reverse proxy the domain to the vault server with help of caddy 3. I had to disable preinstalled certificates on vaultwarden 4. Solve my problem with openWRT (but I will reveal this later ;) )

The Guide

Now I will guide you a little bit (not too detailed, because this post should cover my original problem) on how to retrieve a trusted certificate from caddy for your domain even without exposing the vault to the internet.

Resolve dynds locally only to caddy

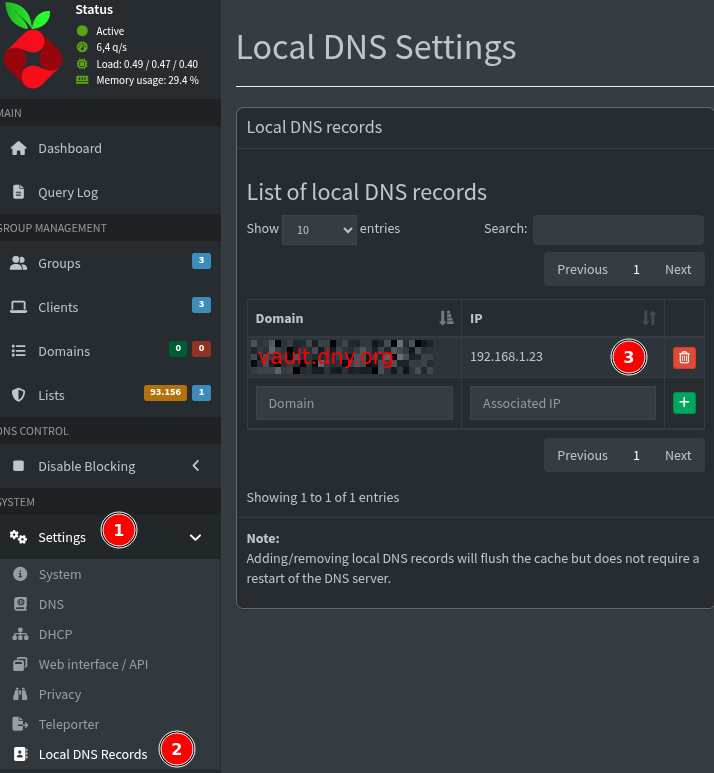
In order to resolve your DNS locally, you need to map the domain to your caddy server. You can do this by adding an entry to your resolve.conf on every device, or more globally on your router or if you have a separate DNS server like Pi-Hole, you can do it by adding a local DNS record this way: pihole

Add reverse proxy to caddy

Now that your DNS points to your caddy server, you can add the reverse proxy entry to your caddy file, which redirects the request to your vaultwarden instance:

vault.dyn.org {
        reverse_proxy http://192.168.1.28:8000
        tls {
                dns desec {
                        token "deducted"
                }
                propagation_timeout 300s
                propagation_delay 120s
        }
}

Note that this is my configuration for desec.io. If you have another way to get a trusted certificate, you need to adjust the entry properly. I got two dynamic dns, so I have to add the tls entry to each domain, so I can separate them

Get rid of preinstalled vaultwarden certificates

To use the trusted certificates from caddy, you need to disable the preinstalled ones from ROCKET_TLS in vaultwarden. For that, you need to find the .env file (in my case it is in the first folder when accessing the instance via ssh) and edit it with the editor of your choice. Now you should find those three lines

ROCKET_TLS='{certs="/opt/vaultwarden/passwords.lan.cert.pem",key="/opt/vaultwarden/ca.key.pem"}'
ROCKET_TLS='{certs="/opt/vaultwarden/ca-chain.cert.pem", key="/opt/vaultwarden/intermediate.key"}'
DOMAIN=https://vault.local

and comment them

#ROCKET_TLS='{certs="/opt/vaultwarden/passwords.lan.cert.pem",key="/opt/vaultwarden/ca.key.pem"}'
#ROCKET_TLS='{certs="/opt/vaultwarden/ca-chain.cert.pem", key="/opt/vaultwarden/intermediate.key"}'
#DOMAIN=https://vault.local

The problem

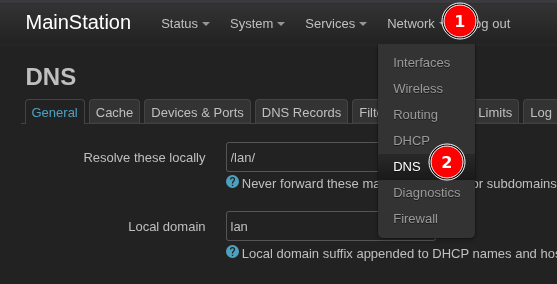
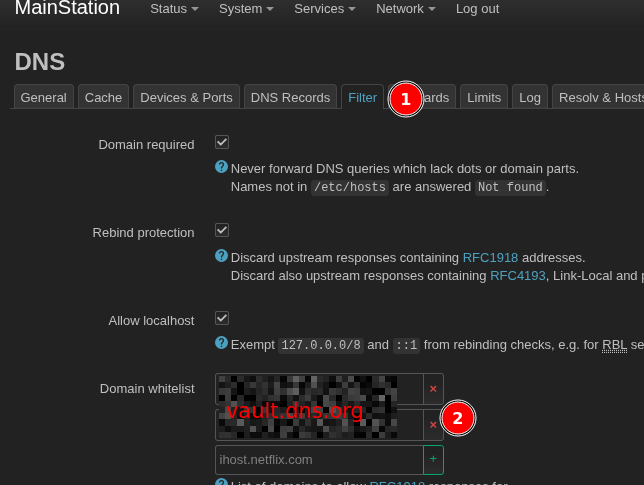
After I did all this, I was not able to access my vaultwarden instance and I knew it had nothing to do with the certificate, because the instance was still reachable via ip and caddy did not throw any errors. NSLOOKUP and pinging the domain also resultet in the ip of caddy, so far so good. Only by coincidence I found out, that openWRT was the culprit. In the logs I found an error entry mentioning that I got a possible rebind attack and the request to my domain was denied. I did not know how to fix this and clicked through the menus and found that option, which solved all my problems: Filter. In openWRT navigate into Network –> DNS –> Filter and add your domain to the domain whitelist. openwrt menu openwrt filter That's it. Now your local only DNS gets a trusted certificate and you can access vaultwarden without exposing it to the internet.

If this will be the final solution? Who knows. But if I find another way, I will post it as well.